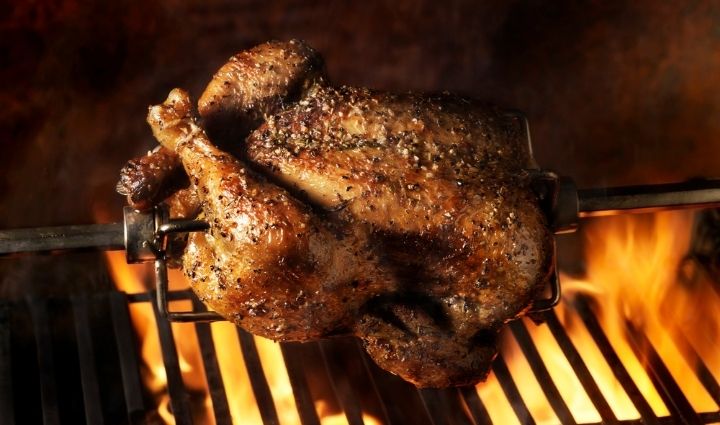
Not much compares to the mouthwatering sizzle you hear when you first put something on the grill—except perhaps the promise of something tasty slowly spit-roasting on a rotisserie.
Unlike other forms of grilling, which are largely a matter of placing prepared food on a preheated grill, rotisserie grilling (which is technically “roasting”) takes a bit of extra prep, as well as some extra tools and accessories. Thankfully, a gas grill rotisserie only takes a few moments to set up, and your reward will be a succulent grilled meal that’s guaranteed to impress.
In this post, we’ll describe the most important grill rotisserie parts and explain how to set up a gas grill rotisserie. But before we dig into these topics, let’s take a look at what rotisserie cooking actually is.
What is Rotisserie Cooking?
A rotisserie is a cooking appliance that uses a rotating spit to slowly roast and barbecue food over indirect heat. Because the spit rotates at a consistent speed, rotisserie cooking essentially allows meat to slowly roast and baste in its own fat and juices, resulting in extremely tender and juicy meat.
Rotisserie cooking can be done over an open fire, but you can also set up your gas or charcoal grill for rotisserie cooking. Some gas barbecue models even come with a specialized rotisserie burner, typically an infrared burner mounted to the back of the grill. If your grill doesn’t have a rotisserie burner, don’t panic—most grills can be set up to handle grill rotisserie parts with ease.
Rotisserie cooking is typically used for larger cuts of meat such as legs of lamb, whole chickens or turkeys, and roasts, but rotisseries can also be used for vegetables and other foods too.
5 Important Grill Rotisserie Parts
Before we explain how to set up your gas grill rotisserie, it helps to understand the most important grill rotisserie parts. Here are 5 parts you need to know about:
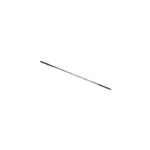
- The spit: The spit is the long rod upon which you skewer your meat or other food. Once loaded with whatever you’re grilling, the spit is placed on brackets that are mounted to the sides of your grill. This allows the food to be suspended above or in front of the heat source.
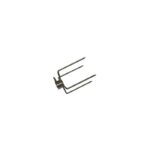
- Spit forks: Spit forks hold your food in place while it cooks. They are typically 2- or 4-pronged forks and attach to the spit using screws.
- Motor: The motor is the electric mechanism that turns the spit at a consistent speed throughout the cooking process.
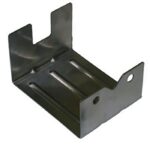
- Motor mount: The motor mount is the point at which your rotisserie mounts to the body of your grill.
- Counterweight: An additional weight that can be mounted to the spit to ensure it is able rotate evenly, ensuring even cooking without prematurely wearing out the motor. Many new rotisserie kits are strong enough to rotate the spit without a counterweight, but you may need one for particularly large or irregularly shaped cuts of meat.
- Rear burner: Some grills have a dedicated rear rotisserie burner, but this burner is not necessary for rotisserie grilling—you can set up a rotisserie kit using just your grill’s standard burners.
Rotisserie kits are available at different price points to suit your grilling needs and budget, and will include all the important parts you need to set up your gas grill rotisserie, including mounting brackets and hardware, spit and spit forks, counterbalance weights, and an electric motor.
Weight limits are an important factor when selecting a rotisserie kit. Different kits are suited to different grilling styles, with options designed for cooking meat around 10 lbs all the way up to 55 lbs. More expensive kits tend to be made from more durable materials and can handle heavier roasts and meats. If you only plan to rotisserie smaller cuts like a whole chicken or smaller roasts, a rotisserie designed to handle about 10-20 lbs should work just fine. If you plan to rotisserie larger cuts or whole animals over an open fire or BBQ pit, look for something rated for up to 55 lbs or more.
GRILL SPOT TIP: If you’re looking for a rotisserie kit, always double check the weight limit of the kit you’re looking at before you buy to ensure it can handle what you plan to cook.
Have a charcoal grill? You can rotisserie too! Charcoal kettle grill rotisserie kits are also available.
How To Set Up a Gas Grill Rotisserie
Setting up a gas grill rotisserie isn’t hard, but it does need to be done properly to ensure even cooking and prevent premature deterioration of grill and rotisserie parts.
If you still have your grill’s user manual, check there first for step-by-step instructions on how to set up a gas grill rotisserie. Otherwise, you can follow these simple steps to set up your gas grill rotisserie:
- Mount the motor by sliding it onto the mounting bracket, plugging it in, and turning it on and off to test that it’s working.
- Set up your grill for indirect heat. On a gas grill, remove the cooking grates and preheat the grill with all burners on high for 15 minutes, then turn off the middle burners, leaving the two outer burners lit to medium. Place a drip pan under the meat but over the heat plates or flame tamers—a drip pan is essential for preventing flare-ups and protecting your heat plates and burners. If you have a rotisserie burner, turn it on now. You won’t need to keep it on the whole time—most experts recommend turning it off after about 15 minutes to prevent overcooking the outside of your food.
GRILL SPOT TIP: Add liquid like water, beer, or wine, or other aromatics like herbs or wood chips into the drip pan to infuse your meat with even more flavor.
- Load your spit with whatever you’re cooking and ensure it’s properly balanced. Mount the spit onto the rotisserie bracket using heat safe gloves.
- Turn on the rotisserie motor and make sure the spit is turning freely, the meat is secure and balanced, and the drip pan is properly placed below the meat. If the meat is unbalanced, you’ll put additional stress on the rotisserie motor and you may need to replace it sooner than you’d like.
- Cook with the lid closed to maintain a temperature around 350°. If you’re using a rotisserie burner, check your meat after 15 or so minutes to ensure it’s not overcooking. Otherwise, follow the usual cook time recommendation for whatever you’re cooking, and be sure to check meat with an instant-read meat thermometer before serving.
When To Replace Grill Rotisserie Parts
If you spot any component rusting, corroding, or melting, or if your motor starts to fail, it’s time to replace those parts.
If one or two components of your rotisserie kit are deteriorating or malfunctioning, you likely don’t need to replace your whole rotisserie kit. Replacement grill rotisserie parts are available and are easy to install, including new motors, new spits and spit forks, replacement mounting arms and brackets, and handles.